It’s about that time ladies (and gents)!! We are slowly transitioning over to sweaters, scarves, and cough medicine. :-( Soon the burning sun rays will be dimming down and the frostbites will be rolling in. I am a Winter baby, however I do not enjoy any weather below 65 degrees; as anything lower than that makes me feel as though my limps may collapse and my skin is turning into sand paper.
 The only way to combat dry winter skin is to keep it nourished during those cold months. Just like your body needs water to stay hydrated, your skin needs emollients and oils to stay moisturized. The best way to fight the effects of the cold is by purchasing skincare (and makeup) products that have more oils and butters in the ingredients. Look for items that include: aqua (water!), glycerin, shea butter, cocoa butter, coconut oil, vitamin e; and natural oils such as: grape seed oil, jojoba oil, avocado oil, argan oil, and sunflower oil. These ingredients naturally condition the skin and lock in moisture without clogging your pores.
 Stay away from mineral oil and petroleum (yes, put that
If you would like to create your own moisturizing lotion, try using these simple ingredients:
½ Cup boiled Shea Butter
2 tablespoons Vitamin E Oil
1 tablespoon Glycerin
1 teaspoon Jojoba Oil (you can substitute for another natural oil)
1 Cylinder container
1 Wooden spoon
1 Ice-cream scooper or Metal Spoon
- Scoop your shea butter (you can add more for a creamier mix) into a cylinder shaped microwave-safe container with a clean ice-cream scooper or metal spoon.
- Boil 1-2 cups water in a pot. Turn off the heat after water is thoroughly boiled. (For best results, temperature should be between 140° and 160° Fahrenheit.)
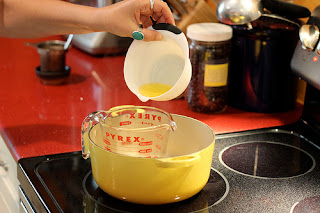
- Place the container with the shea butter inside the pot, but be sure the water does not spill into container. (View picture to right)
- Stir the shea butter with the wooden spoon as it begins to melt in the container. When it is thoroughly melted remove it from the pot.[This process allows the shea butter to melt properly without the use of microwave radiation.]
- Mix the vitamin e oil, glycerin, and jojoba oil into the shea butter.
- Monitor the melted butter mix. As it begins to solidify, use the wooden spoon to whip the butter into a creamy mix. Do this step again after 15 mins to achieve your desired smoothness.
- Scoop the mix into your desired lotion container or jar.(View below image)
- Cover and let sit until it has cooled down.
- Use as often as needed. Shelf life is 2 years.


Taking great care of your skin; especially during cooler months, keeps it looking replenished, young, and supple. You can use this mix on your lips and hair as well. Now go out there and enjoy the last few days of summer weather—as we know the official start of Fall has begun!on today!!
Stay Warm!

